• Home
  • About Us
  • Archives
  • Contact Us
  • Advertise
  • Privacy Policy

Kids Ain't Cheap

But They Sure Are Worth It

  • Home
  • Toolkit
  • Parenting
    • Baby Stuff
    • Books and Reading
      • Aesops Fables
      • Comic Books
    • Education
    • Family Time
    • Green Living
    • Growing Up
    • Healthy Living & Eating
    • Holidays
    • Parenting
    • Random Musings
    • Shopping
    • Stuff to Do
  • Money
  • Product Reviews
    • Books and Magazines
    • Discount Sites
    • Furniture
    • House Keeping
    • Reviews News
    • Toys and Games

How to Make a Diaper Bouquet

September 17, 2020 | Leave a Comment

Having a baby can be expensive, especially when it comes to all of the diapers you need to buy.  In the first few months after baby comes home, you might change the baby’s diapers 10 to 12 times a day!  All of those diaper changes mean you’ll likely go through at least 2,000 diapers in the first year!  Some people try to help offset that cost for new parents by giving diapers at the baby shower.  One fun way to do that is to also make the diapers decorative.  If you’re hosting a baby shower and want a fun but practical centerpiece, here’s how to make a diaper bouquet.

Making the bouquet is not that expensive.  Plus, it’s practical and will be much appreciated by the mom to be.

How to Create a Diaper Bouquet

Supplies for the Diaper Bouquet

To make the bouquet, you’ll need the following supplies:

  • 12 Disposable Diapers,
  • 12 Skewers,
  • Tulle,
  • Rubber Bands
  • A Glass Vase
  • Ribbon for a Bow

You may also want the following additional supplies:

  • Tissue Paper,
  • Fabric such as a Receiving Blanket,
  • Small Baby Supplies like Pacifiers, Rattles, Baby Mitts, etc.

How to Make a Diaper Bouquet

There are a few simple steps to make the bouquet:

Step One – Make the Diaper Flower

Take the diaper and roll it into a tube.

Step Two – Add the Diaper Stem

While still holding the diaper roll in your hand, gently insert a skewer in the center.  Then, wrap a rubber band snuggly around the diaper roll, about one inch from the bottom where the skewer is inserted.  Repeat the process until all diapers are on a skewer.

Step Three – Fill the Vase

How to Create a Diaper Bouquet

Photo by Filip Kowalski on Unsplash

Decide what you want at the bottom of the vase.  Some people cover the outside of the vase with fabric (ideally a receiving blanket so the mom will also have that to reuse with baby) and a bow.  Then they don’t have to fill the inside of the vase with anything since it isn’t visible.

Other people fill the inside of the vase with tulle.

Still others fill the inside of the vase with baby items the new mom will need like pacifiers, rattles, etc.

Another idea would be to use clean, small rocks, especially if the diaper bouquet will be used in a baby shower as the centerpiece and you want it to be stable.  If you’re not sure which way you want to go, Etsy has plenty of sample bouquets you can get ideas from.

Step Four – Arrange the Diaper Flowers in the Vase

Put all of the skewered flowers carefully into the vase.

Step Five – Fill Out the Bouquet

Next, decide what you want to finish filling out the diaper flower bouquet.  Some people buy fake flowers in either pink or blue, depending on the sex of the baby, to arrange among the diaper flowers.  Some people also use fake greenery to add a pop of color.

Other people use tulle the color of the baby’s sex and weave it in and out of the diaper flowers to enlarge the diaper bouquet.  The choice is yours.

Final Thoughts

Diaper bouquets are the perfect center piece for the tables at a baby shower.  Not only are they adorable, but they’re also practical.  The mom-to-be will love to have the pretty decorations as well as a stash of diapers when the new baby arrives.

Read More

5 Free Printable Baby Shower Games,

How to Make the Most of Your Baby Registry

The Best (and Worst) Baby Shower Gifts


Melissa Batai
Melissa Batai

Melissa is a writer and virtual assistant. She earned her Master’s from Southern Illinois University, and her Bachelor’s in English from the University of Michigan. When she’s not working, you can find her homeschooling her kids, reading a good book, or cooking. She resides in Arizona where she dislikes the summer heat but loves the natural beauty of the area.


Filed Under: Baby Stuff, Parenting Blog at KidsAintCheap Tagged With: baby gifts, Baby Shower, Crafts, Diapers, DIY

Christmas Crafts for Kids

December 7, 2011 | Leave a Comment

Children love to create gifts that they can give to loved ones. This is their heartfelt way of showing those who love them most that they love them back. We must keep in mind that not all crafts our kids create will look perfect but that is what makes them so beautiful!

Here are some fun and creative crafts that will be simple to make and your friends and family will be delighted to receive. I also believe that these crafts are so simple that even an uncrafty mom such as myself, can happily join in the fun.

Handprint Wreath

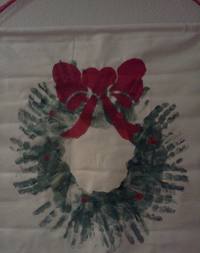
Let your kids make a Handprint Wreath this ChristmasThis is a craft that each of the boys made as at preschool last year and I absolutely cherish it! It can be a little messy but if you are organized about it this (like their fabulous teachers are) it shouldn’t be too difficult to do with preschool age children or older. Of course, you can do this with toddlers if they will cooperate but my experience in getting the boys to make hand prints when they were that age was not great.

What you need:

  • Fabric — A light colored one like the one pictured above will work best.
  • Thin dowel
  • Green and red paint
  • Sponge paint brush and disposable container
  • Large bow Stamp
  • Ribbon
  1. You can make these as small or as large as you would like. It’s totally up to you. So cut the fabric if you need to then either sew – or my favorite is to use fabric tape – to make an opening that the small dowel can slide through.
  2. Put some green paint into a container then take the sponge brush and paint your child’s hand with it.
  3. Instruct your child to spread out their fingers then push their hand gently onto the cloth. Have them lift their hand straight up. You may have to help them with one hand while holding the cloth with the other.
  4. Paint their cute little hand again and repeat Step #3 several times. You’ll want to turn the cloth so you can make a circle of green hand prints. You can overlap a little and remember — it doesn’t have to be perfect!
  5. Let that dry. Then either you or your child can dip your finger in red paint and make round red berries.
  6. Take the bow stamp and dip it into the paint and stamp the top of the wreath with the bow.
  7. After it dries slide the cloth onto the dowel.
  8. Cut a long piece of ribbon and tie it to each end ot the dowel, so this beautiful piece of art can be display each year!

Painted Ornaments

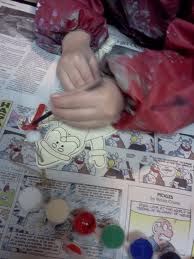
Painted ornaments are an easy Christmas craft for your kidsThis is a SUPER simple craft. The only thing you’ll have to do it clean up a little. The kiddos do all the hard work and they love every minute of it!

What you’ll need:

  • Paintable ornaments that can be found at any craft store. (They are very reasonably priced especially if you catch them on sale and don’t forget to check your Sunday paper for good coupons!)
  • Paint and paint brush– watercolors wouldn’t be great to use but the thicker paints work.
  • Newspaper
  1. Spread out newspaper all over your child’s work space.
  2. Open the paints, get a small cup of water, a paper towel and let the kids have at it. You may of offer instruction if you wish or you can have a sample painted so they have an idea of that colors they can use.
  3. Not crazy about letting your kids have paint? Markers will work really well too and are less messy. I chose paints though because my boys just get so excited when they can use them.

 Bead Wreath

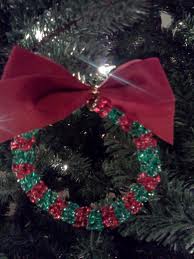
Bead wreath is an easy craft your kids can make for ChristmasDo you remember making these as a kid? You might even have some of your old ones on your tree or at your parent’s house. This is very simple and not messy at all — unless of course someone spills beads all over the floor 🙂

What you’ll need:

  • Beads (or buttons if you prefer)– any color you like will work just fine.
  • floral wire 16-20mm
  • Ribbon
  • Wire cutters
  1. Bend the end of the wire.
  2. String the beads onto the floral wire.
  3. After the wreath is the desired size bend the end of the wire into the other end — cut if needed.
  4. Tie a bow on top of wreath to cover wire and attach string or yarn to the top so it can hang on a tree.

The boys and I also shaped these to look like candy canes and hung them on the tree. So cute!!!

For more Christmas crafts check out my post from last year Super Simple Christmas Crafts for Kids.

 Do you make holiday crafts with your kids? Any other craft ideas to share?

Brian
Brian

Brian is the founder of Kids Ain’t Cheap and is now sharing his journey through parenthood.

 
Email • Google + • Facebook • Twitter

Filed Under: Family Time, Holidays Tagged With: Christmas, Crafts, ornaments, wreath

Super Simple {and really fun} Nature Craft

May 13, 2011 | 3 Comments

Leaf for nature craft

curtesy of FreeFoto.com

Yes, it’s me again — the reluctant crafter. If you have been reading this blog for awhile, then you know I have publicly admitted that I am not one of those wonderfully crafty mommies. I do my best — and my kids seem okay with my limited ability, in this area of Mommy-hood. However, they really do love crafts (even the really simple kind), so I often peruse crafting websites trying to find easy – and not terribly messy – things to do with the kids.

One Saturday morning, I was watching TV and there was a craft show on. It was all centered around fun things to do with the kids. The host of the show, is like the Macgyver of making toys for kids, by re-purposing just about anything (milk cartons, egg cartons, cans, butter containers, broken wooden handles, etc.). Some of the things she made — the boys would have broken faster than it took to actually make. However, she also had some annoyingly creative ideas as well. There was one thing she made that stuck with me and I just tried it the other day.

Nature Walk Craft

I am always looking for fun things to do with the kids — and ways to provide opportunities, to help them learn about the world around them. Admittedly, some days I am better at this than others. On this particular day, I was running out of things to do with the kids, they were wanting to do a craft (I couldn’t talk them into doing watercolors again) and we all really needed to get out for a walk. It was almost lunch/nap time though, so I didn’t have a lot of time to put anything together but I knew I had to think of something — and fast.

That is when this craft came to mind. It’s simple:

What you need:

  • Sandwich bags
  • Yarn
  • A hole punch
  • Construction paper
  • Glue
  1. Take the sandwich bag and punch a hole at the top on either side
  2. Cut a piece of yarn and tie each end into a hole — this makes a collection bag. (The boys wore their collection bags during the walk)
  3. Go on a nature walk. This can be as simple as walking through your own backyard, neighborhood, local park, or taking a hike.
  4. Let the kids look at discover all the things they see. They will stop and examine items and put things their bags. I honestly thought the boys would stuff anything they could see in their bags, but they were pretty selective.
  5. After you are done with your walk — get the construction paper out. You can either let the kids glue their items on their paper, or (this is my favorite method) squeeze out a bunch of Elmer’s glue onto the paper and let the kids glue their items on. They did this while I was making lunch.
  6. Let Dry the picture dry.

This was such an easy thing to do, and I really had no idea how much the kids would love it. The whole time we were on our walk A. was singing “We are going on a nature walk. We’re going on a nature walk.” It was so cute. It was also, the first thing the boys told their Dad about when he got home. They had a blast, got some fresh air, good exercise, and made a craft like they wanted to.

It’s the simple things that make life so sweet. My kids have definitely taught me that! 🙂

Do you use crafts to make everyday experiences memorable? What other nature crafts can you recommend?

Brian
Brian

Brian is the founder of Kids Ain’t Cheap and is now sharing his journey through parenthood.

 
Email • Google + • Facebook • Twitter

Filed Under: Family Time Tagged With: Crafts, Nature, Nature Walks, Outdoors

Super Simple Christmas Crafts for Kids

December 17, 2010 | Leave a Comment

Simple christmas crafts for kidsOkay – before we go any further – I just have something I need tell you all; I am not a super-duper, craft-tastic, Mom. You might be saying, “Come on Christie, you can do crafts! Anyone can be crafty if they really set their mind to it.” Ha! Not true — and here is a quick example to illustrate my point.

When I was pregnant with our boys, I was on bed rest for 3 months. So, I thought maybe I would try to learn how to crochet. My Mom is great and it, and so was my Grandma — so naturally I had to be great at it too, right? Wrong!

My Mom brought me lots of yarn, a few books on crocheting, and spent some time tutoring me on how to make a baby blanket. You would think that someone with 3 months to spare; someone whose day consisted of watching “Little House on the Prairie,” court room dramas, and eating peanut butter toast, would be able to carve out a few hours each day to really perfect the art of crocheting.

Nope! Not me. I made two blanket-ish looking things, but even the dog was too embarrassed to use them. I can’t say that I blame her.

I’ve tried scrap booking, needle point, and sewing; none of which turned out well.

I’m fine with that. I have other talents. I don’t need to be crafty to be complete; but kids love crafts — so I’ve had to bite the bullet and figure out how to do some of these things.

My point is this, if I tell you I have crafts to share, crafts which are simple and easy; you’d better believe they are. I really dislike doing a search for simple crafts; only to  discover I need 20 items, oodles of time (and patience), and there is about a 99% chance our dog will end up with glitter and paint all over her.

So here are 4 crafts for you, which are simple and not too terribly messy. I promise!

Christmas Tree Ornament:

What you need:

  • Craft Sticks
  • Glue gun
  • Green felt or construction paper
  • Markers
  • pipe cleaner/ribbon/yarn
  • foam stickers

Now — you can make this as simple or elaborate as you would like. I have two 3yr olds so we go the simple route.

Directions:

  1. I let the boys color the crafts sticks with green markers.
  2. Then I hot glued the sticks together to make a triangle and attached green felt to the back.
  3. I had some wonderful winter themed foam stickers that a friend gave me and just let the boys put them on as they would like.
  4. Finally, I glued a pipe cleaner on the back so we could hang the ornament up.

See? Simple! If you have older kids, they can use craft glue and they might like to decorate the tree with buttons, glitter glue, puff paint, uncooked pasta, paints, or whatever else you can think of.

We also did some Snowflake Ornaments which consist of the same materials. These are just craft sticks, hot glue, paint, glitter puff paint, and a pipe cleaner. Here’s a photo:

Salt Dough Ornaments

I loved making these because I love to cook. The boys enjoyed cutting out the shapes and decorating them.

What you need:

  • 1 Cup Flour
  • 1/2 Cup Salt
  • 1/2 cup water
  • Cookie cutters
  • Paint
  • Glitter Spray (optional — but totally cool)
  • Black Marker
  • Ribbon/yarn/string

Directions:

  1. Preheat oven to 250 degrees
  2. Combine flour, salt and water. Knead and flour dough until it isn’t sticky anymore
  3. Roll out dough until about 1/4 inch thick
  4. Cut out shapes with cookie cutters (if you don’t have cookie cutters handy you can cut into squares or triangles and things like that)
  5. Cook for 2 hours
  6. Let cool
  7. Let the kids paint and decorate. We painted one day and the next they decorated with markers
  8. Give ornaments a little spritz with glitter spray and you are good to go!

Hang them on the tree, tie them on packages, or let the kids wrap them up to give to grandparents.

Foam Sticker Collage

This one is so simple; I’m almost embarrassed to include it — but my kids were quiet for a long time doing this project and they were really proud of their work.

What you need:

  • Construction Paper
  • Foam Stickers

Directions:

  1. Get out the paper
  2. Get out the stickers
  3. Let the kids go crazy creating!

These are simple and the biggest mess you’ll have to clean up, are the backings from the stickers and whatever stickers fall on the floor. That’s it!

The kids get to have fun and I don’t have to stress about the mess. It’s a win, win for all!

If you have a simple craft idea you’d like to share — please do! I’d love to hear about it.

Are you crafty? What crafts do you enjoy making?

Brian
Brian

Brian is the founder of Kids Ain’t Cheap and is now sharing his journey through parenthood.

 
Email • Google + • Facebook • Twitter

Filed Under: Holidays, Stuff to Do Tagged With: Christmas, Collage, Crafts, ornaments

Easy-Peasy Homemade Halloween Decorations

October 16, 2010 | Leave a Comment

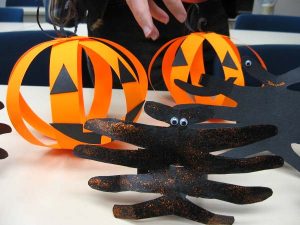
Halloween CraftsHalloween is that time of the year when kids can dress up in their spookiest outfits.  This is when I think about how to prepare my house for the visiting little goblins and witches.

Of course, budget is never far from anyone’s mind these days.  This year, I decided to go the route of homemade Halloween decorations.  I decided to make it fun by taking on little “projects” that my son could help me out with.

Outside Spookiness

1.  The classic jack-o’-lantern

Take some Terra-cotta pots (make sure they are clean and dry), and invert them.  Cut out the eyes, nose, and mouth from some yellow-orange craft paper.  Get some all-in-one glue and spread it over the surface of your pot, stick on your jack-o’-lantern’s face, and seal it with another coat of glue. Place an old tree branch in the center for the stem of the pumpkin.  Line the pots on the sides your porch steps or on a flower pot ledge. This is an easy, kid-friendly, and cheap way to decorate the entrance of your home for Halloween.

2. Wolf path

Take some sponges and download some templates of wolves paws that fit the size of your sponges.  Use the templates to cut and create your own paw-sponge.  Get some washable glow-in-the-dark paint, dip them in, and place on the ground- maybe in your garden, or leading to the entrance of your house.  Your kids will love doing this! You’ve got a neat, washable, cheap and enticing trick to get the kiddies excited over the treats you have inside.

Inside your Haunted House

1.  Window treatment

Choose two window panels facing the front of the house (or any part where the trick-or-treaters are likely to pass).  Get some black cardboard and cut them out to fit exactly the shape and space of your windows.  Take note- mom’s and dad’s should do this part.  Then measure out pumpkins eyes, nose, and mouth and again cut them out. Make sure these holes can be seen from the outside.  Take orange tissue paper or bright orange cellophane and paste them to the holes.  From the outside, it will look like you have spooky windows.  My son loves this neat trick!

2. Kids corner:

This is one the kids will love to help you out with.  Collect an old hanger, some glue, yarn, neon paint or markers, and fiberfill and you’re set to go!  Download templates of bats and half moons and have your kids color them using neon markers or non-toxic, glow-in-the-dark paint.  When they’re done, cut them out, align the front and the back and glue together making sure to insert yarn in the top center part of the bat.  Take your yarn and tie them to the flat end of the hanger in varying lengths (think of those pretty hanging lights you may have in one of your corners).  Hot-glue the fiberfill to cover the entire hanger and then glue the half moon cut-outs in them.  Hang in your child’s room- let them pick out the corner!

Some Tips to Decorate Your Treat Table

Use some orange and black cloth to cover your table.  You can purchase a bit from your local store, just enough to be a runner. Fill old jars (remove labels and wash) with orange cellophane and candy for treats.  You can use jars of varying sizes, although wider ones would be advisable if you have them. Or you can use old tin cans, cover them with black craft paper, stick cut-out pumpkins eyes, nose, and mouth onto one side, and then fill with treats.

There are so many homemade Halloween decorations you can use to make your home Halloween-ready without too much fuss, money, and time required.  What’s most important is making it fun for your kids and their friends!

So, Happy Halloween! Trick or treat everyone!

How do you decorate your home for Halloween?

Brian
Brian

Brian is the founder of Kids Ain’t Cheap and is now sharing his journey through parenthood.

 
Email • Google + • Facebook • Twitter

Filed Under: Holidays, Home and Living Tagged With: Crafts, Decorations, Halloween

  • Facebook
  • Pinterest
  • RSS
  • Twitter

Basic Principles Of Good Parenting

Here some basic principles for good parenting:

  1. What You Do Matters: Your kids are watching you. So, be purposeful about what you want to accomplish.
  2. You Can’t be Too Loving: Don’t replace love with material possessions, lowered expectations or leniency.
  3. Be Involved Your Kids Life: Arrange your priorities to focus on what your kid’s needs. Be there mentally and physically.
  4. Adapt Your Parenting: Children grow quickly, so keep pace with your child’s development.
  5. Establish and Set Rules: The rules you set for children will establish the rules they set for themselves later.  Avoid harsh discipline and be consistent.
  6. Explain Your Decisions: What is obvious to you may not be evident to your child. They don’t have the experience you do.
  7. Be Respectful To Your Child: How you treat your child is how they will treat others.  Be polite, respectful and make an effort to pay attention.
Best Parenting Blogs

Copyright © 2025 Runway Pro Theme by Viva la Violette